Updated on 02/13/2026
- Review the artificial grass installation cost breakdown and see how contractors cut corners to advertise lower prices.
- Navigate the artificial...

Installing artificial grass yourself? Find how to save money and achieve a great-looking lawn. We've created a DIY turf installation guide to assist you throughout the process, as well as walk you through maintenance best practices! Get the job done right!
*Note: While manufacturer recommendations are to use Class II Road Base during artificial grass installation, decomposed granite is a favorite among people who want to DIY their own project. It provides the best results without the need for heavy machinery or expensive hauling.

This artificial grass installation guide will take you through the step-by-step process to ensure that the new lawn installation goes smoothly and you end up with a lush looking lawn. Here’s every detail you need!
To ensure a proper installation of your artificial grass, it is recommended that you have a few essential tools at your disposal. While you may already have some of these tools in your garage, you can easily purchase them from your local home improvement store, such as Rona, Home Depot, or Lowes.
Here are the tools you'll need:
1. Rake - for leveling and preparing the ground.
2. Hammer - for securing edging and other materials.
3. Utility Knife - for cutting the artificial grass to size.
4. Wheel Barrow - for transporting materials and debris.
5. Flat Head Shovel - for digging and removing existing grass.
6. Compactor (Plate Tamper) or Roller - for compacting the base and ensuring a level surface.
7. Power Broom (or stiff bristle push broom) - for brushing the artificial grass and keeping it upright.
Having these tools on hand will make the installation process much smoother and more efficient. So, gather them up or head to your local store to get everything you need to get started on your artificial grass installation journey.
To ensure a successful installation, it's important to have the right materials on hand. You can easily find all the supplies you need from Bella Turf or any of our authorized Bella Turf Dealers nationwide. Simply use our Dealer Locator to connect with our trusted dealers and purchase the materials that are perfect for your project.
Here's a list of the essential materials you'll need:
1. Artificial Grass
2. ¾” Road Base (3/4” rock down to dust) OR Decomposed Granite
3. Decomposed Granite Stabilizer (If DG is used)
4. ¾” Clear Crush (Drain rock) for Areas with Poor Drainage
5. Seam Tape and Glue
6. 4” Galvanized Spiral Turf Spikes
7. Bagged Infill of Your Choice
By having these materials readily available, you'll be well-prepared for a smooth and successful installation process.
Before you begin your artificial grass installation project, it is crucial to have a well-thought-out plan in place. This will ensure a high-quality result and minimize any waste. Start by measuring and mapping out your yard to determine the best layout. Keep in mind that most of our artificial grass products come in 15-foot widths, but if you need to deal with seams, account for 14.5-foot grass sections.
When planning your installation, consider the direction of the grass blades. Many shaped yarn products are directional, so it is important to lay the artificial grass rolls in the same direction. InstallArtificial offers various blade options, including wave blade, soft blade, and u-shape blades in many color options and textures. We also have pet-specific artificial grass, affordable synthetic turf, and plush and soft artificial grass to meet your needs. Start shopping now!

Choose the right product and installation supplies for your artificial grass installation. InstallArtificial offers a wide range of artificial grass, as well as artificial turf installation supplies and artificial grass infill. We are here to provide you with all the support you need throughout the process.
Once you have your plan in place, it's time to plan out your base. Calculate the square footage based on your measurements and consider factors such as the application and climate. Our website provides helpful resources, to assist you in determining the right steps to installation.
a.) Keep the surface dry, no watering. Most of the grass will die making it lighter and easier to remove.
b.) Scrape the surface with an aluminum landscape rake to remove the top layer. Dump this into your green waste bin to save on hauling and waste removal!
This will help prevent weeds from popping up through the surface in the future. If you have any leftover roots underneath the soil it's very important that these are killed. Weedkiller is typically effective enough, and you may only see the occasional weed on the edge.
Alternatively, you can lay weed barrier cloth to keep weeds away. In our opinion, weed barrier cloth is not highly effective and can trap bacteria beneath the surface. For this reason, we don't often recommend weed barrier cloth as it's just an extra cost and doesn't offer much protection.
To stabilize and support the base of artificial grass, you'll want to make sure there is proper landscape edging installed. Most often for residential projects, polymer bender boards will be used. However, in certain scenarios you may used treated wood boards or aluminum boards. Artificial grass edging will need to be installed to separate the turf from planters, fencing, and other softscape.
To prepare the base, lay a 1 in. layer of DG along the surface of your base. Use a push broom to evenly spread the DG, and then use a heavy-duty roller to compact and smooth grade the surface. Repeat this process two or three times for the best results.
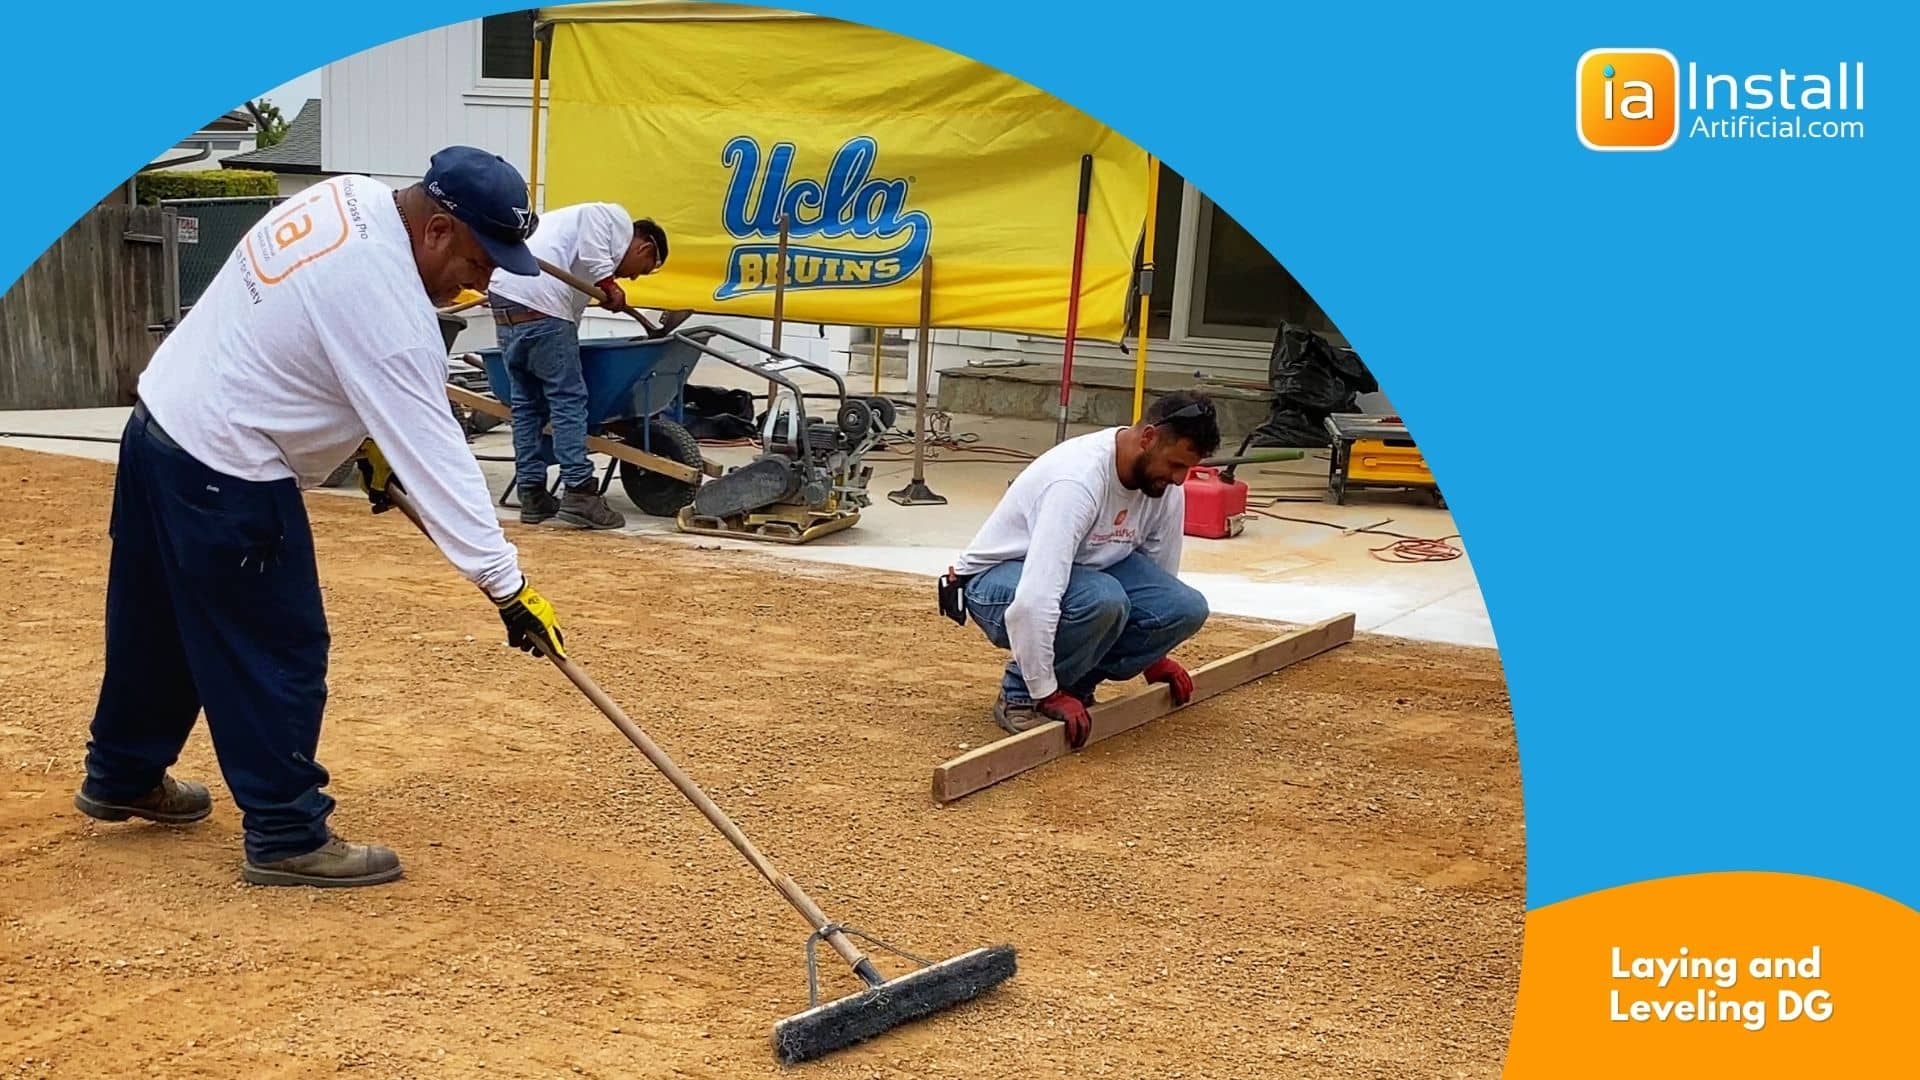
Next, the decomposed granite must be treated with a stabilizer. This will make the base sturdy enough to hold onto nails during the turf installation process. Skipping this step will cause the nails to not fully secure and your turf to start lifting from the edges with time. Allow the area to dry fully before moving on to the next step.
To learn how to prep and Install pet-friendly turf, check out our other article: How to Install Pet Turf - DIY!
Lay the turf roll in the sun for 30 minutes before unrolling. This will make the material more manageable. Unroll on a flat surface, ensuring all blades are facing in the same direction. If necessary, cut the turf to size to ensure it fits in your space. Measure multiple times before cutting!
If you are installing artificial grass near a patio or garden edge, you can simply remove the outer tuft along with the factory edge. However, if you are cutting to prepare for a seam, it is recommended to remove the outer three tufts and the factory edge. When laying two pieces of grass side-by-side, make sure the joining blades are standing vertically and not leaning towards each other.
When trimming around a patio or garden edge, ensure that enough blade is sticking out of your knife to cut the backing before the blades. With the knife in one hand, grab the side of the grass being removed and pull it back to expose the backing. When cutting, the backing should be tight to the patio edge without touching, and the gap should be no bigger than 1/8 inch.
To cut up to a wall or fence, fold the turf back and press it tight to the corner. Place the blade against the backing where it lands closest to the wall, then lift the turf up and cut 6 inches at a time. Check the fit by laying it back down. Take your time to ensure the backing is not tight against the edges.
Relief cuts are necessary when cutting around corners, trees, or posts. Start from the furthest outward point and cut through from the backing out to the edge of the artificial grass. Remove any excess grass to make your next cut more manageable.
Similarly, when cutting against a wall or fence, fold the turf back and make small outward relief cuts at the point where the backing meets the object. This will allow you to cut from point to point, fitting the artificial grass to the exact curvature of the object. Take your time to avoid any gaps or fraying of the backing.
Once you have finished your cuts, the grass should lay loosely around any objects without touching them. This will create a beautiful and natural look, especially around stone, block trees, or any other perimeter on your installation site.
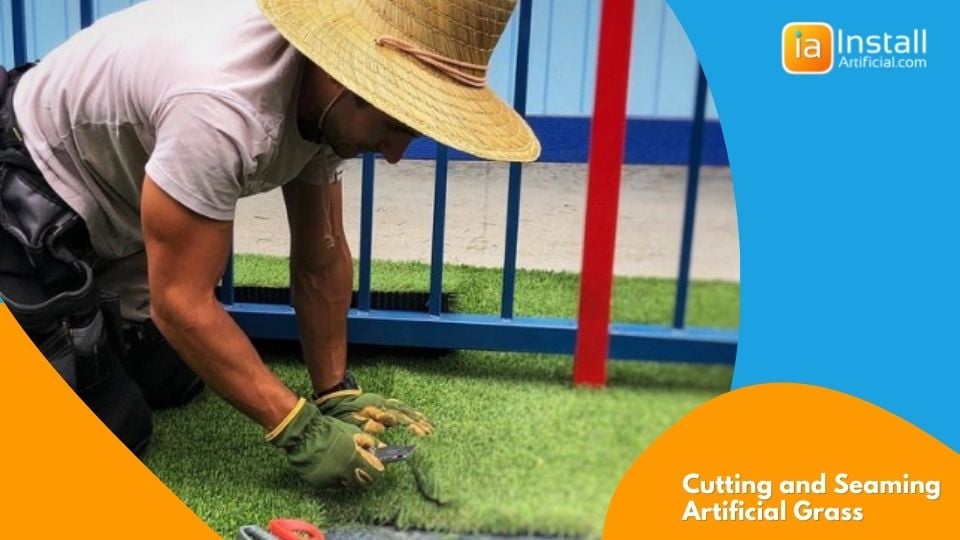
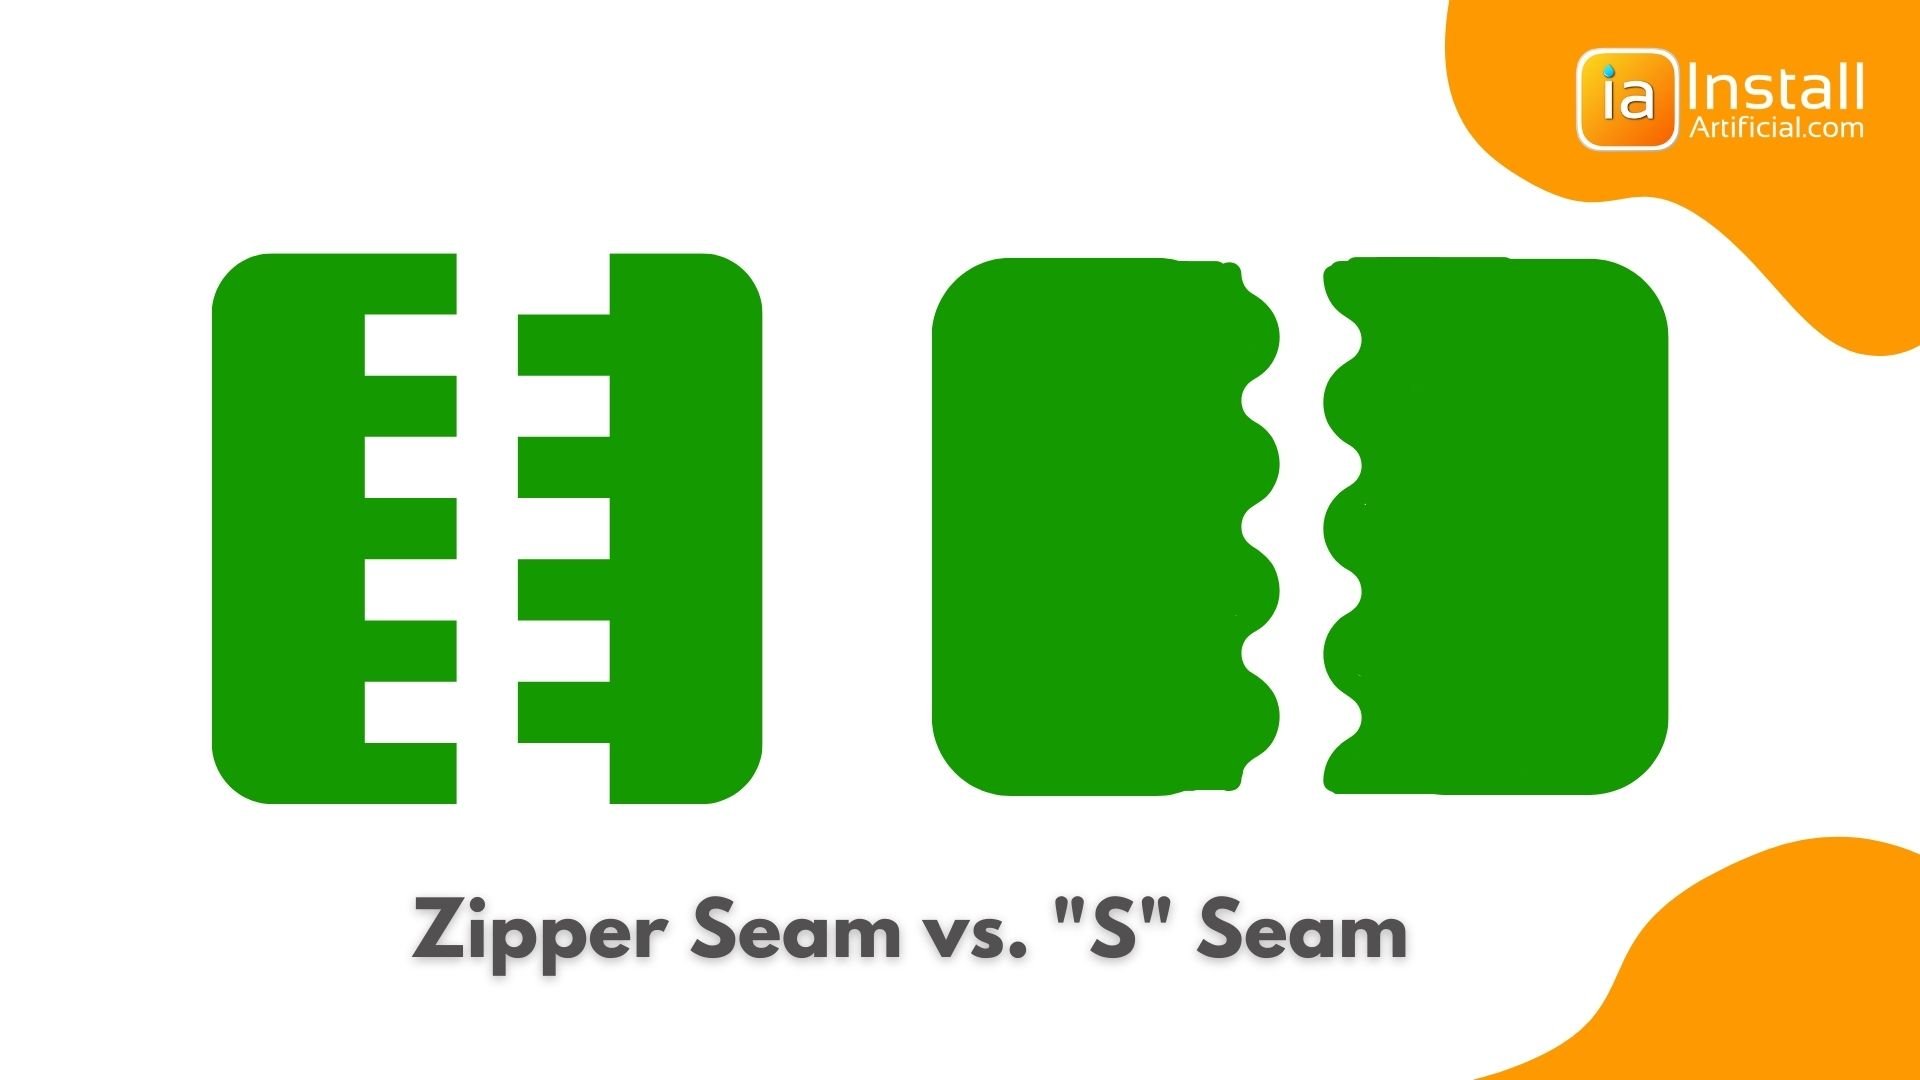
This step is only necessary if you have multiple pieces of artificial grass. Once the artificial grass is measured and cut to size, seam the pieces together using professional adhesive. For best results, use the zipper method to make the seams less visible.
When seaming in a straight line, the eye can spot small inconsistencies, and most often you'll see a line where the two pieces were seamed together. Instead, we break the line and cut the stitching before seaming to pull the pieces together the same way a zipper does. This method creates an illusion to the eye and will provide invisible seams.
A more popular method of seaming is creating an "S" shape on the edges of the pieces and seaming them together. When done correctly, this provides the same results as the zipper seam and hides the visibility of the seam. However, this is a much trickier method and it's easy to make mistakes. Once these mistakes are made, they're also extremely difficult to repair. For this reason, we'd recommend using the zipper method when seaming two pieces of artificial grass together.
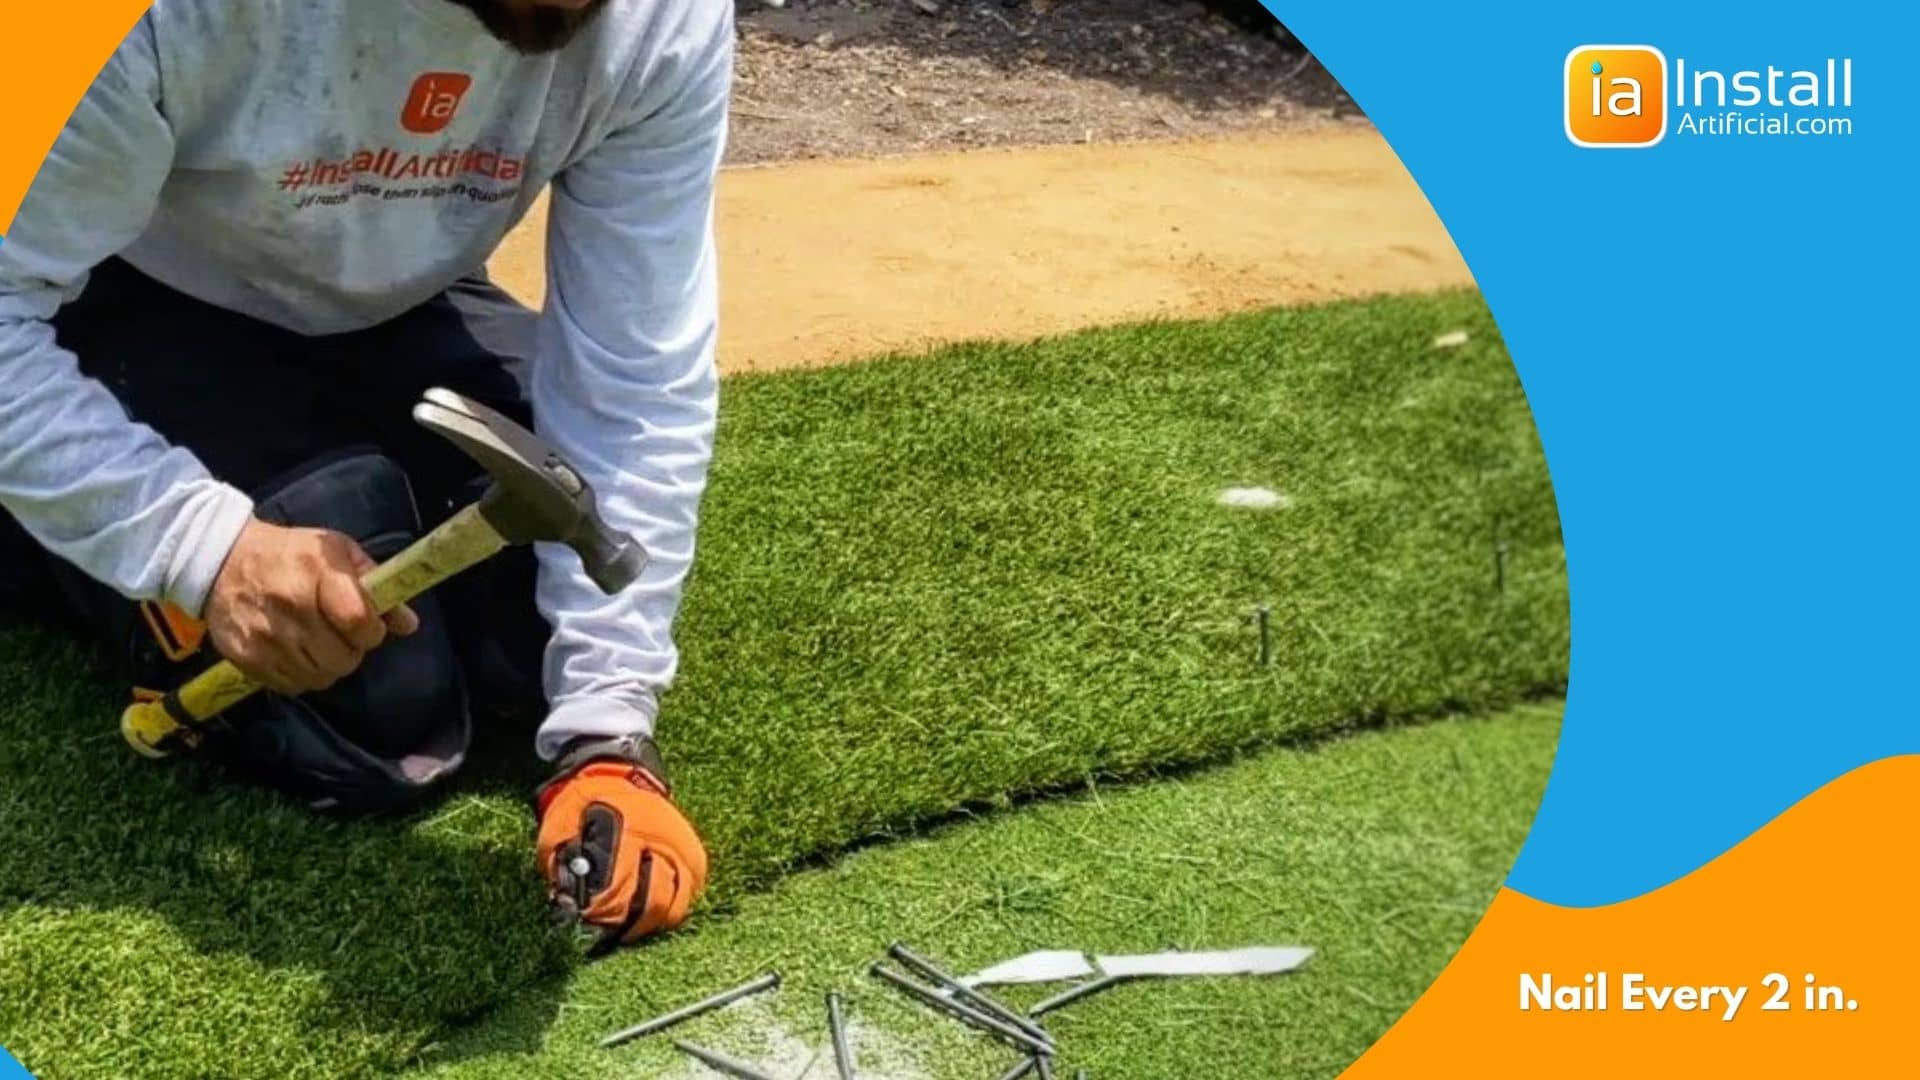
Stretch and nail down the turf along the perimeter every 2 in. Stretching the artificial grass on the sides is very important. It will help to prevent wrinkles and buckling over time. Make sure that the nails are hidden and deep. Use non-galvanized nails to ensure the nails won't come up over time. We also recommend nailing every 2 ft. throughout for added stability.
While many cut corners during this step, sand Infill in turf applications offers multiple benefits. This will help with blade recovery, protect the backing of your turf from harmful UV rays, and even prevent wrinkles! We'd recommend using an anti-bacterial sand infill to make the surface cooler and cleaner for pets and recreation. Lay approx. 1 lb. per sq. ft.
To infill the bulk of your artificial grass, start by placing a bag in your wheelbarrow and carefully slicing open the bottom with a utility knife. While a drop spreader can be used for this step, it's always a good idea to have a grain shovel on hand for filling in the edges and corners of your synthetic grass.
With a well-balanced load of infill on your shovel, hold it parallel to the ground and move in a smooth backwards motion, ensuring that you drop a consistent amount of infill with each pass. This technique may require some practice, but once you get the hang of it, you'll be able to effectively infill smaller areas using this method.
If you choose to use a shovel for infilling, make sure to maintain level scoops and ensure that the right side of your shovel is dropping the same amount of infill as the left side. Holding the shovel at an angle can result in unwanted bumps on the finished surface and may negatively impact the installation of the artificial turf.
Remember, there's more finesse involved than simply throwing sand onto the grass. Work in straight lines and ensure total coverage across the entire surface of the grass. With experience, you'll be able to distribute the infill from your shovel just as evenly as a drop spreader would.
Consistency is key when it comes to the infill layer. The smoother you spread it, the better the surface will feel underfoot once it's all brushed in. Apply the infill material in thin layers each time to achieve the best results.
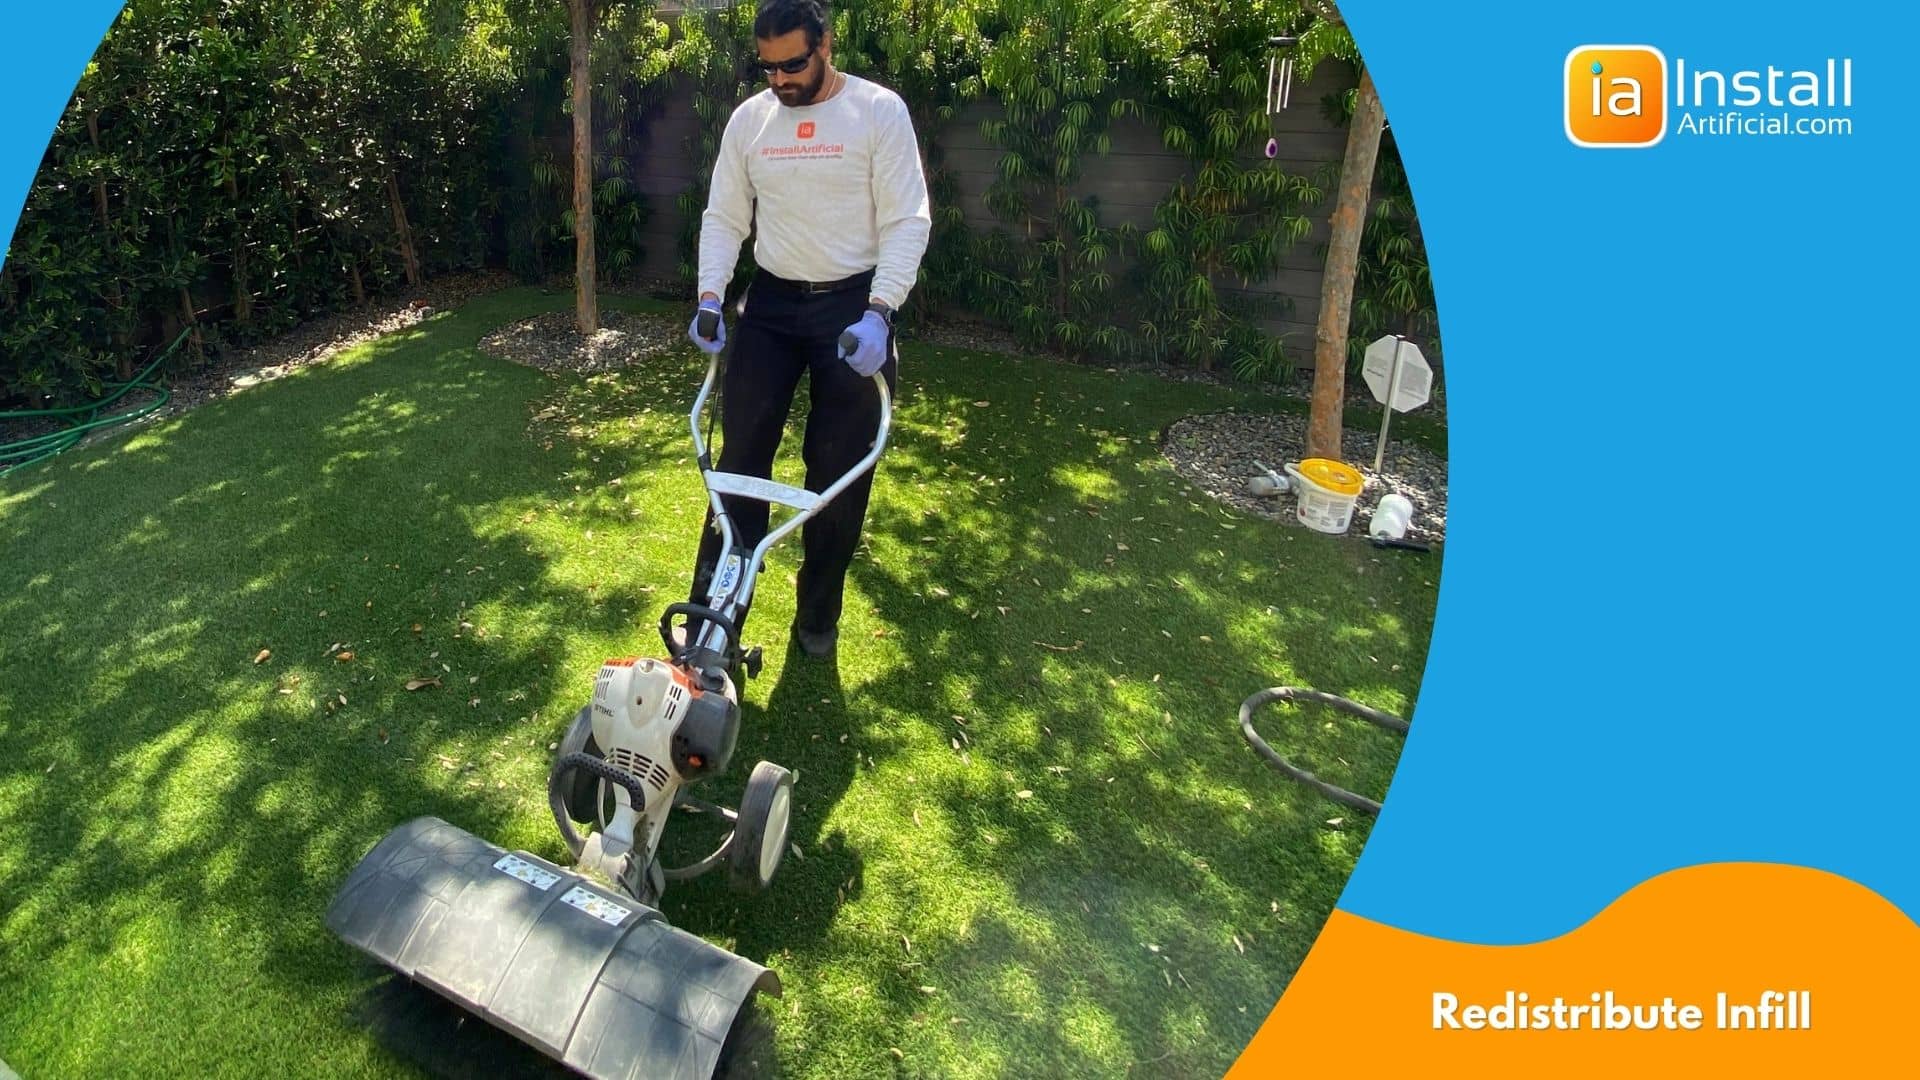
Use a push brush to evenly distribute the sand across the surface, allowing the infill layer to seamlessly drop into the backing of your artificial grass. It's important to avoid using too much force when using a power broom on your turf, as this can cause more harm than good. Instead, apply firm downward pressure and gradually increase the throttle until the power broom effortlessly pushes you backwards. Walk slowly in reverse, maintaining steady pressure, to effectively work the infill deep into the artificial grass.
By using a low throttle, you'll prevent the infill from ending up in unwanted areas and achieve a smoother layer beneath the blades. Work methodically in rows, overlapping your passes to ensure that all of the infill is evenly distributed and the blades are standing upright. Continue with this technique until no visible infill remains on the surface of your artificial turf installation.
When working close to walls, angle the power broom so that the axle is away from the wall, allowing the bristles to brush down into the corner. It may take a bit of practice to find the perfect angle, but smooth out all perimeter edges and meticulously brush over your newly installed grass surface to ensure it is perfectly groomed and standing tall.
We recommend a power broom similar to this one on Amazon.
Perhaps one of the most sought out benefits of artificial lawns is reduced maintenance needs. Because you're removing soil and dirt from the surface, artificial grass can remain clean and pest-free for years! We'd recommend occasionally flushing the surface with a hose to remove dirt and debris. You can also use a stiff-bristled brush every so often on the surface to redistribute the turf infill and bring the blades upright if needed. To learn how to keep pet-friendly artificial turf clean, check out our favorite cleansers!
If you're ready to begin your DIY artificial grass project, let us support you the whole way! Check out our Online Turf Store to browse high-quality grasses from trusted suppliers, and get them at a discounted price. We'll assist you in purchasing the right fake turf for your needs, and ship it directly to you! Begin by requesting a deal below.
When it comes to installing artificial grass, it's important to do it the right way. One crucial aspect is to make sure you install it on dirt and not on top of existing grass or weeds. Take the time to prepare the dirt properly, ensuring it is smooth, flat, and free of any debris that could cause damage to your turf. For a step-by-step guide on how to install artificial grass on dirt, refer to our comprehensive artificial grass guide above.
When installing artificial grass on a concrete surface, it's crucial to pay extra attention to drainage. To ensure proper drainage, it's recommended to use a turf underlay beneath the artificial grass roll. This will allow water to drain out from underneath the turf, preventing issues such as mold and unpleasant odors, especially if you have pets using the grass. Additionally, using a turf underlay can make the artificial grass more comfortable to walk on, as concrete surfaces can be hard and cold. If you're installing on a concrete surface, be sure to follow our guide for installing turf on concrete, rooftop, deck & patios. For more information, click here.
It is strongly advised against laying artificial grass directly on top of your existing grass or lawn. This can lead to significant drainage issues and allow weeds to grow through the grass fibers, as there is no weed barrier in place. Additionally, the turf will have an uneven surface and its longevity will be reduced. If you choose to lay artificial grass in this manner, you will be wasting money and it will not be covered by any warranty.
When installing artificial grass between concrete slabs, it's best to use a stamp compactor when preparing the base to ensure it's solid even between the small gaps. 4" spaces are typically the most ideal for installing turf between pavers. It's also very important to make sure that all the blades are facing the same direction when you're laying and securing the strips. Want to learn more about installing fake grass between pavers? Check out our turf stripes installation guide now!
How to install artificial grass on a slope or a hill?
Installing artificial grass on a slope or hill requires a bit more effort and attention to detail compared to installing it on a flat surface. For large slopes, you'll need to install a membrane to keep the turf from slipping over time. You'll need to invest additional time and labor to ensure a smooth and even surface on your sloped terrain. Rest assured, though, that you can achieve artificial turf base preparation on sloped and flat landscapes to ensure a flawless installation.
When installing artificial grass on a balcony or deck, it is important to consider proper drainage. To ensure water can easily drain out from below the turf, it is recommended to use a turf underlay. This will help prevent issues such as mold and unpleasant odors, especially if you have pets using the grass. Additionally, a turf underlay can make the artificial grass more comfortable to walk on, as balcony surfaces can be hard on your feet and cold.
The cost of installing artificial grass can vary depending on various factors. In 2023, the average cost is estimated to be around $10-13 per square foot, including labor expenses. However, it's important to note that prices can range from as low as $8.50 per square foot to as high as $20 per square foot. If you choose to install the artificial grass yourself, you can expect to pay between $4.50 and $7 per square foot for materials alone, without factoring in labor costs.
To find out more about the cost of artificial turf installation, check out our artificial grass cost calculators for ballpark pricing in minutes!
Installing artificial grass can be a time-consuming process, especially if you're doing it yourself. Depending on the size of your yard, it may take anywhere from 1 to 3 days to complete the installation. However, if you want to save time and ensure a professional finish, it's worth considering hiring a professional landscaper. Not only will they have the expertise to get the job done quickly and efficiently, but they may also offer a warranty of up to 15 years on the installation. So, if you value your time and want the peace of mind that comes with a professional installation, it's definitely worth considering.
Yes, artificial grass goes by many names, but they all refer to the same thing. Whether you call it artificial turf, synthetic grass, fake grass, or astro turf, it's all a fantastic alternative to natural grass.
We highly recommend reaching out to your local artificial grass installer and seeing the product in person. This will give you a better understanding of its quality and suitability for your needs.
Before making a final decision, it's important to obtain multiple quotes that are specific to your property. This way, you can fully grasp the cost of astroturf per square foot and make an informed choice.
Updated on 02/13/2026
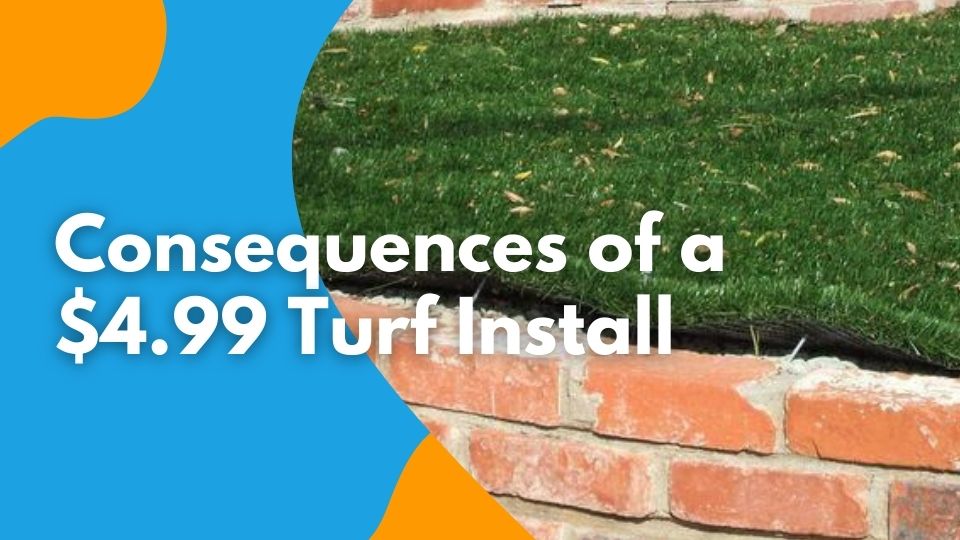
Learn how cheap contractors are offering turf installation at $4.99 per sq. ft. Discover what you're really getting at this cost. Below we’ll walk you through how they...